Calculating orbital elements for a game that gives little information isn't too hard.
I mean, it's only rocket science.
but seriously, rocket science isn't too scary once you realise some basics.
Almost all 'normal' orbits are in the form of an Ellipse. These things are basically circles squashed to varying degrees.
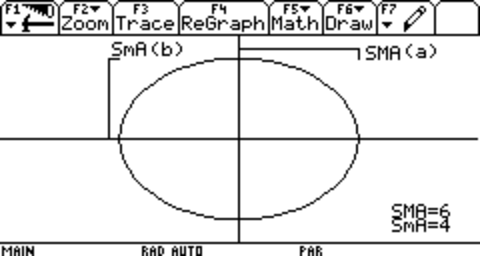
Now, since an ellipse is not entirely uniform in how wide it is, given how you measure it, we give two measurements: Its major axis (How wide it is at most, represented in the image by A) and its minor axis (How wide it is at least, represented in the image by B).
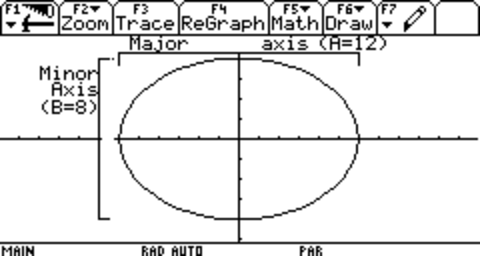
Now, we usually don't care about the whole major and minor axes, so we halve them and call them the Semi-Major Axis(SMA, usually represented in equations by a) and Semi-Minor Axis(SmA, represented in equations by b)
Drawing an ellipse is sort of like drawing a circle, but slightly more complex. To draw a circle in real life, you wrap a rope around a peg (representing the focus of the circle) in the center and drag it around. This gives a circle - a shape who's center is always the same distance apart from the edge. But Ellipses work slightly different. In real life, you need two pegs with a rope wrapped between them (Preferrably, a loop of rope stretching between both pegs, plus a little bit to create a bit for your stylus). This is what an ellipse is: A shape where the distance between both foci via any point on the shape is always constant.

Now, in an elliptical orbit, one of these foci is where the center of the gravity well is (In the case of a sattelite, it's usually the planet, moon, star etc, it's orbiting) and the other one… we don't really care much about it.
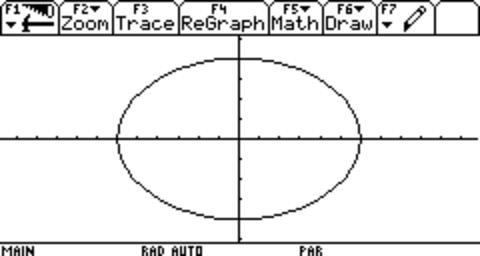
The Graph you've been seeing is a Parametric graph. Now, Parametric graphs define X and Y through a second variable called T. The equation for this ellipse is:
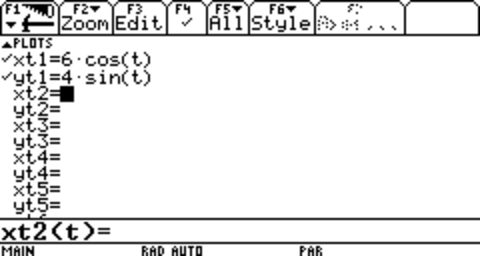
Which, if you've taken Pre-calc/Trigonometry (Like I have), you will realise that this is a modified form of the Unit Circle.
Now, parametric ellipses are great for figuring out what ellipses do and how they work, and it's also really easy to shift them just by adding or subtracting a number from either or both of the equations used to make them. However, to actually map an orbit, a better equation would be a Polar equation. This one works more directly like a unit circle: r, the distance away from a central point, is a function of an angle (θ) between the point and the place you define as being 0, going through the central point. We use this equation:
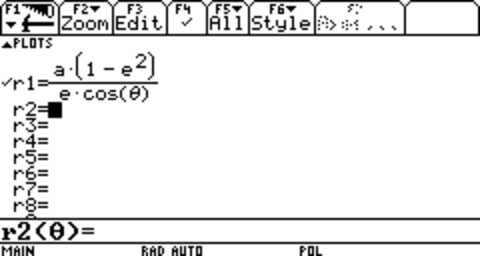
Which creates, with an a of 7, and an e of .75, this:
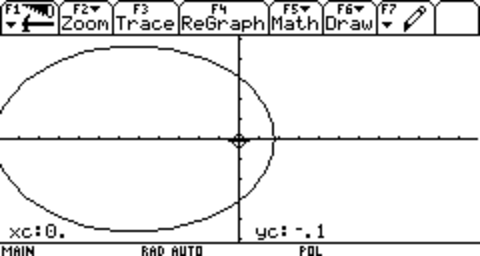
This is great for plotting an orbit, because this equation automatically puts its center around one of the two foci. That way, you don't have to shift the function to make it appear like it's centered around a focus. But you may wonder what a,e, and θ really mean when talking about orbits. We'll get to that in the next section.
Let's ignore the fact that all orbits in real life are in three dimensions. Not even I understand how orbits work in three dimensions yet. Also, let's not limit ourselves to Ellipses.
Ellipses are only one of a whole multitude of orbit shapes. They are called Conic Projections, due to the fact that to get them, you slice open a cone diagonally and see what the shape looks like.
 .
.
The first pair of cones represent a Parabolic shape. The second two represent ellipses of varying degrees. and the third pair represent a Hyperbolic orbit. Why two cones, tip to tip? because a hyperbolic function has two branches, and to show it, you need two cones.
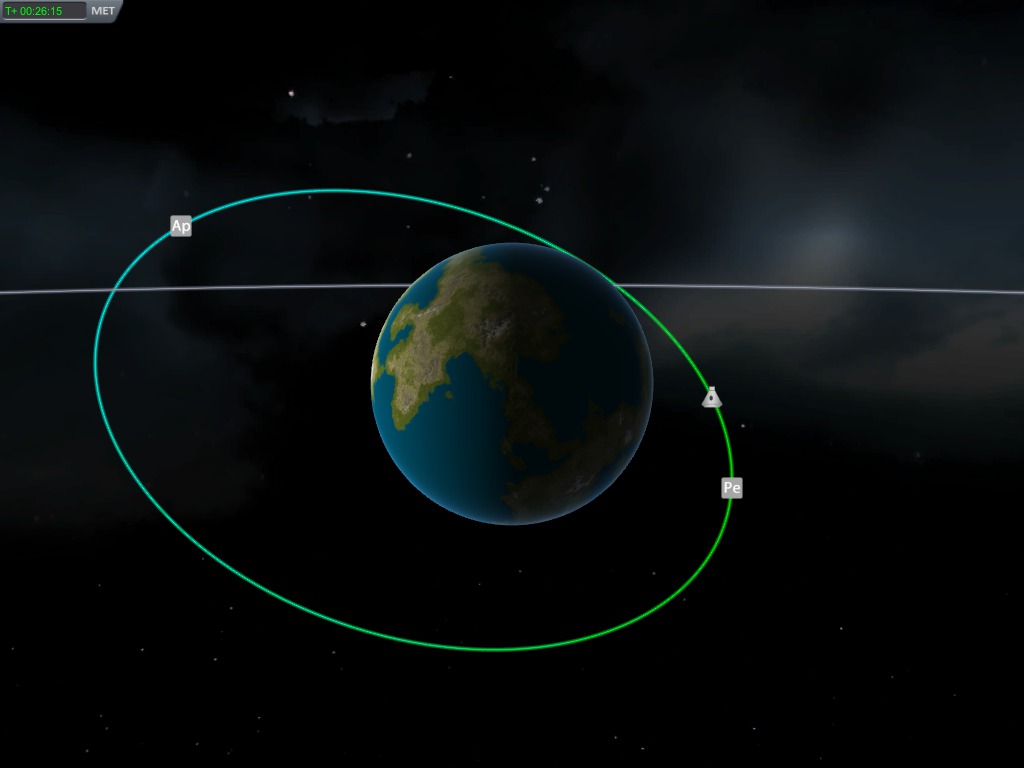
Now, an orbit's most basic definitions are (usually) its Apoapsis and Periapsis. KSP represents these with Ap and Pe on the map screen. I will represent these with f and n, respectively.
Apoapsis is where the spacecraft is farthest away from the planet/moon/star/whathaveyou.
Periapsis, by contrast, is where the spacecraft is closest to the planet/moon/star/whathaveyou.
The planet/moon/star/whathaveyou is always situated at one of the two foci, as stated previously.
Apoapsis and Periapsis are the most basic, but by themselves, they are usually inadaquate . You'll need another basic measure: The Semi-Major Axis(a) we just decribed. The SMA is half the distance between the Apoapsis and Periapsis.
But, wait, there's more! The fourth basic measure, Eccentricity (e) is how not-circular an orbit is. Orbits with 0 eccentricity have no difference between Apoapsis and Periapsis (In other words, they are a circle). Orbits with eccentricities between 0 and 1 are Elliptical (I.E they are ellipses) and orbits above 1 are Hyperbolic (They only have a periapsis, for they are going too fast to come back to the planet). They are usually called escape trajectories, but I'm getting too far ahead of myself. Orbits of exactly 1 are parabolic. These go exactly fast enough to escape and as such are weird to calculate.
Then, there's Period (p), which is how long a spacecraft takes to go from Periapsis to Apoapsis and back again.
Then we have True Anomaly. This is how far away you are from Periapsis, but in a different way. True Anomaly (θ) is where you are in the orbit, measured in degrees. When at Periapsis, you are at 0°(or 0 radians). When at Apoapsis, you are at 180°(or π radians). Normally, people describe a ship's true anomaly, they usually describe you as being between 0 and 360° (Or between 0 and 2π). I will do things differently: Spacecraft will be within -180° and 180°(-π and π), with 0 being periapsis. (0 is always Periapsis.)
Orbits have simple properties.
These are the simple laws, but there are more. The point is, all of these more basic values have a relationship to each other (whether it be direct or through a number of more complicated descriptions of orbit). So, knowing that...
Now, for a project I'm doing, I'm trying to expand this calculator into the 3rd dimension. This is my best understanding as of right now:
To add a third dimension, we need to talk about an extra rule about orbits: They always cross the equator of a planet. if you draw a line around a given celestial such that it is exactly parallel with its center, every real orbit will cross it at some point. The three-dimensional elements answer a simple question: Where on the equator does the orbit cross the equator, and at what angle are you off by when you do?
Inclination (i) is used to define the angle. Your inclination is essentially the angle when you cross the equator. It is also the maximum latitude you will attain, north and south. Meanwhile, where we cross is defined using the Longitude of the Acsending Node ☊. Strangely enough, it is not a longitude in respect to the main body - that turns, and ☊ doesn't unless you change your orbit or play Gallileo's Planet Pack and get entangled in... Nevermind.
So how do you calculate it from a single point? Well, you'll need where you are in degrees, and you'll need your flight path angle from north. Luckily, flight path angle goes by a name we all should know: Heading. Heading numbers are the number of degrees you are from north - 90 is east, 180 is south, and 270 is west. KSP's nav-ball gives these readings - Just point prograde and read the number at the bottom. What's less intuitive is our latitude and longitude. No capsule has this on the interior. However, one part in stock KSP does:

the Surface Scanning Module gives your latitude and longitude at all altitudes, LIVE. just right-click on it and read. Unfortunately, it gives planetary longitude - the turning planet. Luckily, we have a solution for that. We just need to figure out what the apparent local sidereal time is. Sidereal time is what time it is in a sidereal day. A sidreal day is not a normal day. Instead, it is how long it takes for a planet to go a full 360 degrees, as opposed to a solar day, which is the time between high noon and high noon. A solar day rotates slightly more than 360 degrees, as this image shows:

And here we run into a problem we may not be able to overcome. You see, nothing in KSP gives time like that. The closest thing we have is the in-game clock, but it only gives MET and universal time - not sidereal time at body. We need to know what time it is at the prime meridian, at a given time, at a given point in the planet's orbit. Good thing the simulation always starts the same way, with the planets in the same orientations and rotations. This means we just have to look at some config files. For Kopernicus, look in your planet pack's GameData folder and locate your target planet's .cfg file. The lines you are looking for are initialRotation for determining what time it is at the beginning of the simulation and RotationPeriod for determining the sidereal time. For stock KSP… no. Just no. KSP has its planets hardcoded in a way that you have to look it up on the Internet. I'm sure it's there somewhere.
However, once you figure that out, the rest is a cinch.
Back to home