Planning ahead is hard. I mean, you have to have a goal in mind first. Then, you have to realistically budget your Delta-V, decide what exactly you are going to do, and so on and so forth. This is why the majority of plans in KSP are rudimentary. but if you want to plan out all of your mission, Here's how my second calculator, supposed to do that very thing, does it/will do it.
Strangely enough, this is probably the last thing we need to calculate. As far as I can tell, to go interplanetary you'll need to work backwards from the end - figuring out a cause for a certain orbit, then figuring out the cause for that cause, then figuring out a cause for that cause, and so on.
I'll start with inclination. This is actually quite easy: the cosine of inclination i is equivalent to the cosine of launch latitude ϕ times the sine of heading β. Since I'm pretty sure I cannot use those characters in TI-68k basic, I'm going to use i for inclination, gp for latitude, and gb for heading. In which case, the basic relation looks like this:
cos(i) = cos(gp)*sin(gb)And solving this equation for what we want to know (what heading we need to launch) is easy:
gb=arcsine(cos(i)/cos(gp))This will allow you control over inclination. The next part of this - what time we need to launch at to get a specific ascending/descending node - is slightly more difficult. For these things, you need to both counterract the rotation of planet you launch from and launch when the launch site crosses the plane of your desired orbit.
You'll need to figure out what engine burns will do when you plan a mission. There are three ways you can burn:
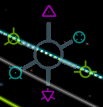
Look, a Picture speaks a thousand words, so let this picture from KSP about the manuver node system explain. The yellow ones are the -grade directions, the blue ones are the -Radial directions, and the purple ones are the -Normal directions.
You don't need to restrain yourself to adjusting along one axis at a time - You can make any manuever a combination of all three.
So how can you tell what you're doing with these things?
Prograde and Retrograde directions are simple. They just slow you down and speed you up. No need for anything fancy: For any given point along the orbit, you first calculate how fast you're going along it:
Then you add how many m/s prograde or subtract how many m/s retrograde you want to change your speed by:
Then, you can just calculate it using the seat-of-the-pants calculations.
Making a perfect Normal burn is usually impossible: as you make the burn and your orbit's direction changes, Normal and anti-Normal will change as well, so unless you rotate to follow perfectly, you will end up adding some -grade velocity changes along with it (Or -radial velocity changes, if you are turning in three dimensions to follow) However, if you could pull it off, a perfect burn doesn't actually change the velocity vector - just where it's pointed. To figure out how much delta-v you'd need for a change of θ degrees:
ΔV=2Visin(θ/2)Which, as you can see, has Vi - the total orbital velocity - as a co-efficient. This means that, for a given change, it will cost significantly more ΔV when you are at a faster part of your orbit as opposed to a slower part. This means that when you want to do an inclination change (The primary use of Normal burns) it may be more efficient to bump up your apoapsis, change the plane there, and re-circularise back at periapsis than it would be to simply do the plane change at the original altitude
As far as I can tell, radial burns are just like normal burns, but turned perpendicular to both the Normal and Prograde vectors. This means that the same equation applies, and it's similarly impossible to do it just right.
Just like you can create an orbital velocity vector out of three single-axis velocity vectors, you should be able to make a coherent maneuver direction out of the three orbital manuver vectors I have laid out here.[CIATATION NEEDED]
Orbital mechanics is like an endless series of cause and effect. The velocity changes I laid out in the previous section can be thought of the means that justifiy the ends. What are the ends? These:
Hoemann transfer orbits are seemingly everywhere. That's because they kind of are neccessary.
In essence, they are just an altitude change - a shift from one orbit of a particular altitude to another by way of a third that crosses both. This may not seem like much, but the idea of 'shifting from one orbit to another' is basically the way to get anywhere in the solar system. So, how do you do it?
Well, a Hoemann Transfer orbit typically looks like this:
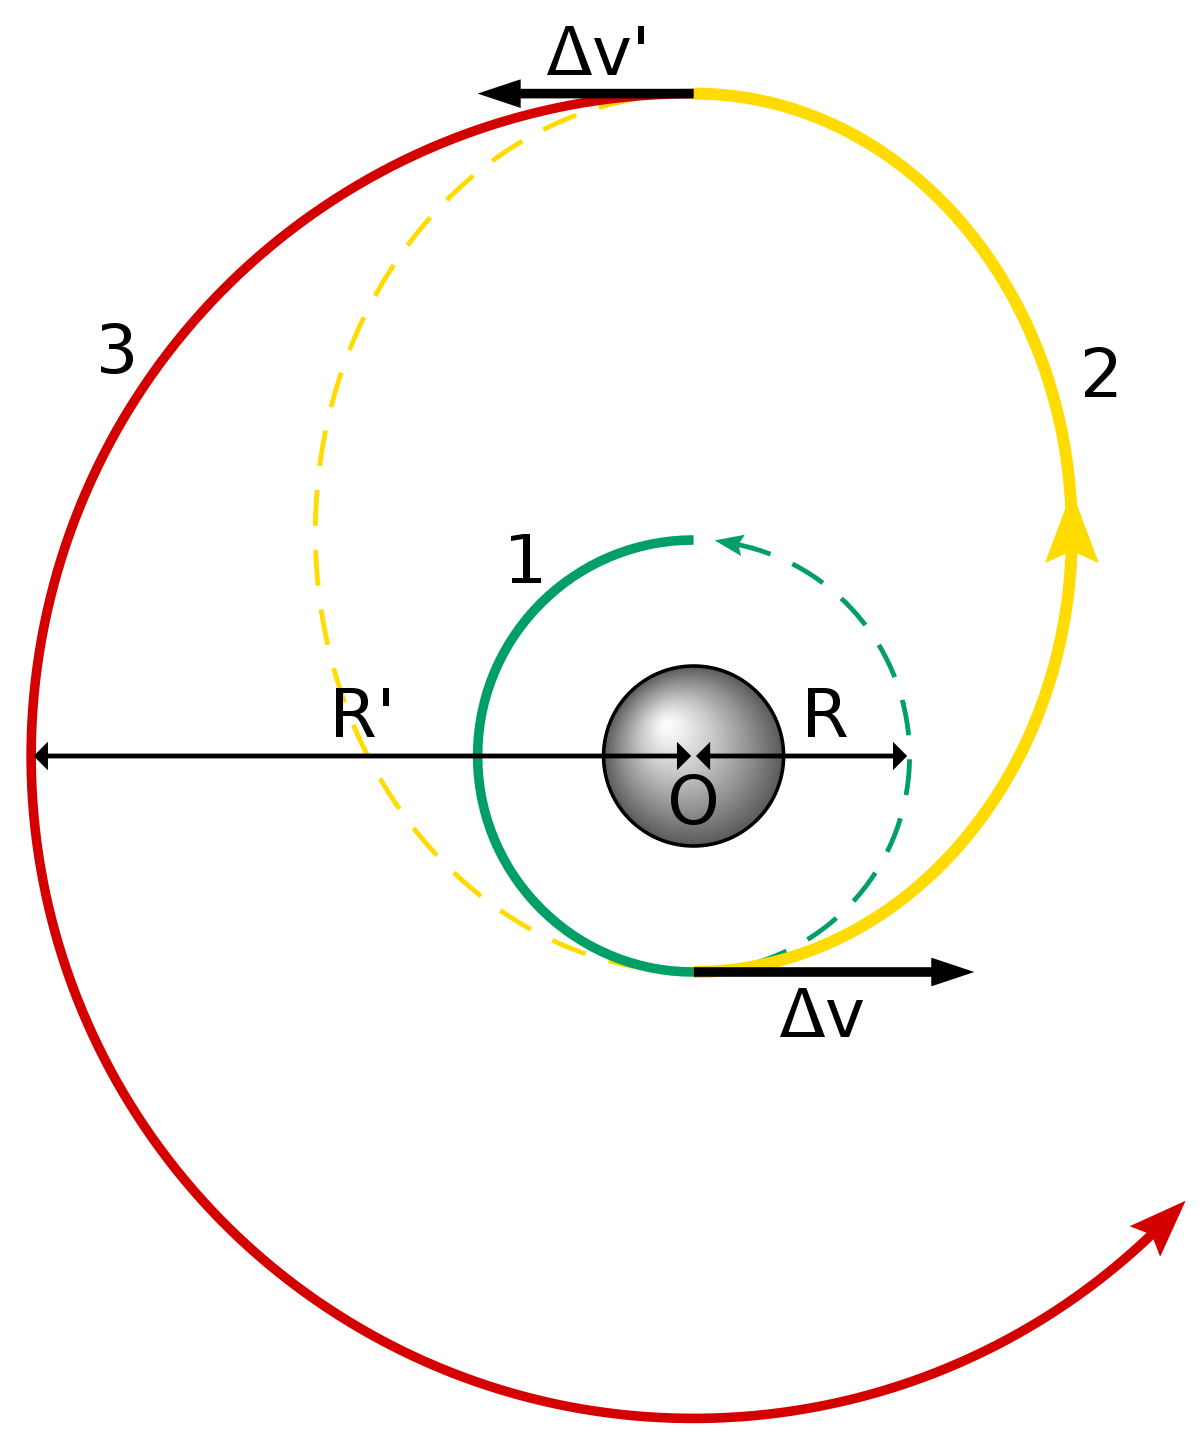
As you can probably see, you go from the inner green orbit to the outer red orbit by way of the yellow ellipse. The ellipse is the transfer orbit itself.
So, how do you calculate a transfer orbit?
Well first, you need to decide on the apsides of the transfer orbit. Wherever you start burning will become one of the apsides of the transfer orbit, and the other one will usually be the point where you leave the transfer orbit and enter your final orbit. If you are increasing your altitude, you will start at periapse and go to apoapse. If you are decreasing your altitude, you will start at apoapse and end at periapse.
Then, you need to calculate the entirety of the orbit. This includes the all-important semimajor axis, eccentricty and orbital period. The Eccentricity and Period are extras (you really only need the semimajor axis) but I think the period is a good thing to calculate if you want to do rendez-vous.
From now on, the majority of the calculations I am going to do will require the Vis-Viva equation, used to find the speed at a point in an orbit with a given semimajor axis:
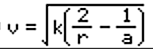
Where r is your current altitude, a is the semimajor axis of that current orbit, and k is the gravitational parameter.
Why do we need this? Well, to get how much you'll have to change your velocity where you start, you will have to calculate your speed at that point in your normal orbit, then calculate the speed at the start of your transfer orbit (either apoapsis or periapsis, depending), and the ΔV will be the difference between that and the speed at the start of your transfer orbit. (This is, of course, assuming that you do not do a plane change at the same time.)
Hoemann transfers are two-burn affairs: One burn to enter the transfer from the starting orbit, and one burn to leave the transfer orbit and enter the finishing orbit. But there are other ways to change altitude. One such way is by making an orbit with apoapsis farther than either orbit, adjusting the periapsis up or down to match a desired orbit, and then burning at periapsis to circularise in the new orbit. This is called a Bi-Elliptic transfer, and it is simply more than the Hoemann. It's more efficient, as the adjustment burn happens at an apoapsis. It's more versatile, since the transfer orbit can be any period you want and has similar steps to go both higher and lower in altitude. It also takes more time, since you have to go farther than either orbit, and more engine burns, which means if engine restarts are limited and fuel boils off (A common occurrence if you have realism mods), then the Hoemann transfer may be worth it.
Now, say we have to get to a target in a different orbit using these methods. What do we do?
Well, What we have to do is make sure that we time the transfer orbit in a way that it reaches the target orbit at the same time slightly before/after the target point is there. Slightly before if the target altitude is higher, so we can speed up before the target passes us by. Slightly after if the target altitude is lower, so we can slow down before we pass it by. How do we figure out when to start the transfer orbit?
Well, assuming that your target orbit is an ellipse makes things much harder, but also much more consistent, since the hard way is often applicable to more use cases.
To calculate the amount of headway you need, you first need to know how long it will take for the transfer orbit to reach the rendez-vous point. This is usually half the period in a Hoemann transfer, and the sum of the two transfer orbits' half-periods in a bi-elliptic transfer. Simple enough, but now we need to find out how much the target will travel in that time. This is more difficult, as in an elliptical orbit, speed is certainly not constant. So we need our Starting point to figure out our target point.
But to figure out our starting point, we need to figure out the target point! and we need both of these to figure out the period of the transfer orbit, which will affect our start and target points even more! ARRRGGGGHHHH!!!
Well, as it turns out, the method of solving this is called 'Lambert's Problem', and while my grasp on the subject isn't as good as it should, I have an explaination of my methods Here.